This section summarizes the devices that are controlled via the Tuya Cloud. IRControl currently supports the following devices:
- Eachen IR Contrrol Hub
- Auvisio WLAN Remote Control (Pearl)
- Aigoss iIntelligent WiFi/IR Remote Control (Smart Life)
Other devices that are controlled via the Tuya cloud have not been tested, but may also work.
Such a device is set up manually in IRControl. To do this, go to the «Devices» tab in Setup and press the button  . Press the button
  on the new page (Add Device).

Select the appropriate device as the device type (Eachen IR Transmitter, Pearl IR Transmitter or Smart Life IR Transmitter). You can freely choose the name and ID or keep the values specified by the system.
Now the Tuya Clout (Cloud Setup) must be configured. To do this, press the «Create Account» button on the Cloud page.»Create Account».
Register Cloud Account

Enter your email address and continue with  . A verification code will then be sent to your email address.

Enter your desired password and confirm it again in the next field. In the verification code, you enter the character sequence that you received in the verification email. Finish with , then the cloud account will be created.
Register Cloud Device
Now you have to register the device in the cloud. To do this, call up the «New Device» function in the cloud overview.

If the WiFi name was not automatically detected, enter it under WiFi SSID. Then you have to enter your WiFi password in the «Wifi Password» field.
Then press the reset button on the infrared transmitter until the small lamp starts to flash quickly. Then you can start the registration process in IRControl by pressing the Start button. After completion, the new device is displayed in the device list. Now you have to connect it to the IRControl Device (press the Pair button).
Infrared Target
For each device you wand to control with the Inrfrared transmitter, you have to add a Infrared Target.

Register the Infrared Target with a name for the target and a unique ID. The Parameter IR Protocol is optional. It will be used to generate infrared sequences.
Now you have to register the infrared codes on the tab «Commands».
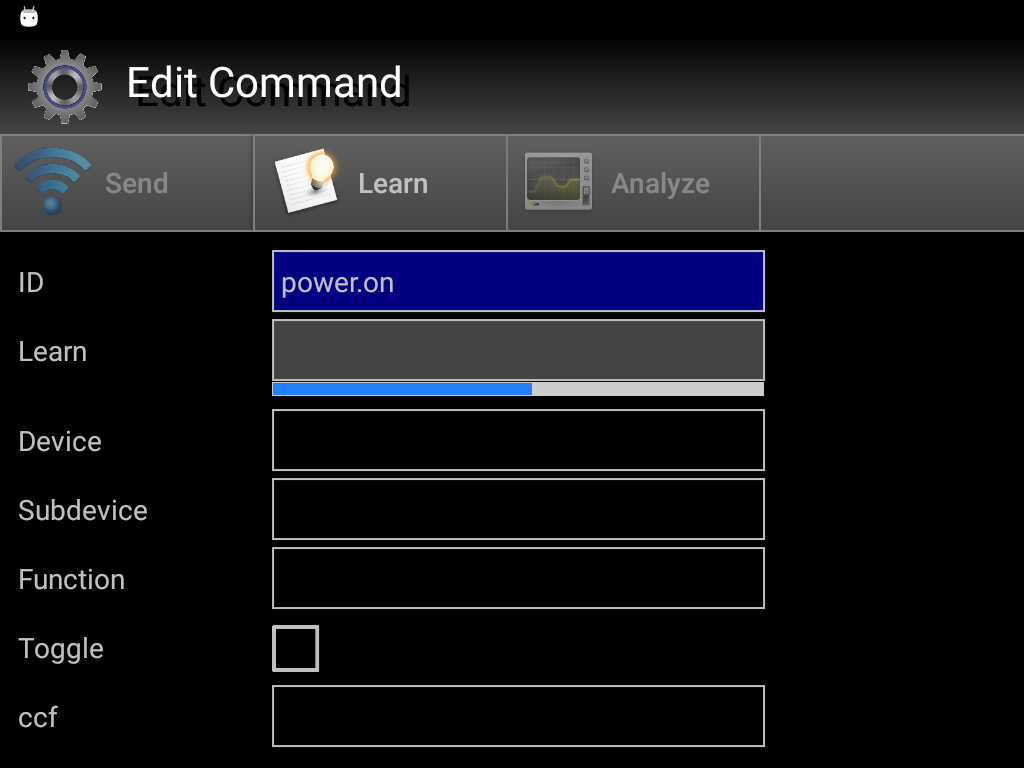
Add your commands by pressing the button . Enter a unique ID for the command code.
Now you have the possibility to add the control sequence as a Philips
Pronto Code (ccf) or as a function definition (device, subdevice and
function). But the easiest way is to learn the infread sequence by
sending it with your remote control.
To learn a infrared sequence press on the Learn button. Now you have to send the desired infrared sequence from your remote control to the inrfrared device. If the signal could be recognized, «OK» will be displayed in the Learn field.
With the Analyze Tool you can analyze the infrared sequence code. Press the Analyze button to start the tool. If the infrared sequence code be decoded the concerning function definition will be displayed. You have the possibility to store the sequence directly in this decoded form after. The IR Protocol also will be set on the tab Target in this case. This transformation of sequence is optional. The command could also be sent directly with the learnd infrared sequence.
Parameter «Toggle» is used for some devices while sending the same control sequences multiple. This information will be included in the control sequence each second time. So the target device can recognize, that the sequence was sent again. This is not supported for all protocols. Mostly the RC5 protocol has such a toggle bit.
With the send button you can transmit the control sequence to your target device for testing purpose.
